Knowledge Base - Member Portal
How can we help?
Dues Billing
Dues Billing with Attendance Incorporation (Article)
This article will provide you with a comprehensive guide for using the Dues Billing module in MemberDay. Recently, we introduced the incorporation of attendance into our billing system, streamlining the invoicing process.
Updated 6 days ago
In this article, we'll walk you through the entire Dues Billing process from setup to tracking payments.
Dues Billing Process
Creating Billing Profiles
Configuring Invoices
Managing Attendance Fees
Email or Distributing Invoices
Recording Payments
Billing profiles allow you to create invoices faster and easier for specific sets of member groups. In the Dues Billing module you will be able to set and handle:
Dues
Meals
Guests
Attendance
Ad hoc charges or assessments
Email and distribution of invoices
Record payments
1. Create and Manage Billing Profiles:
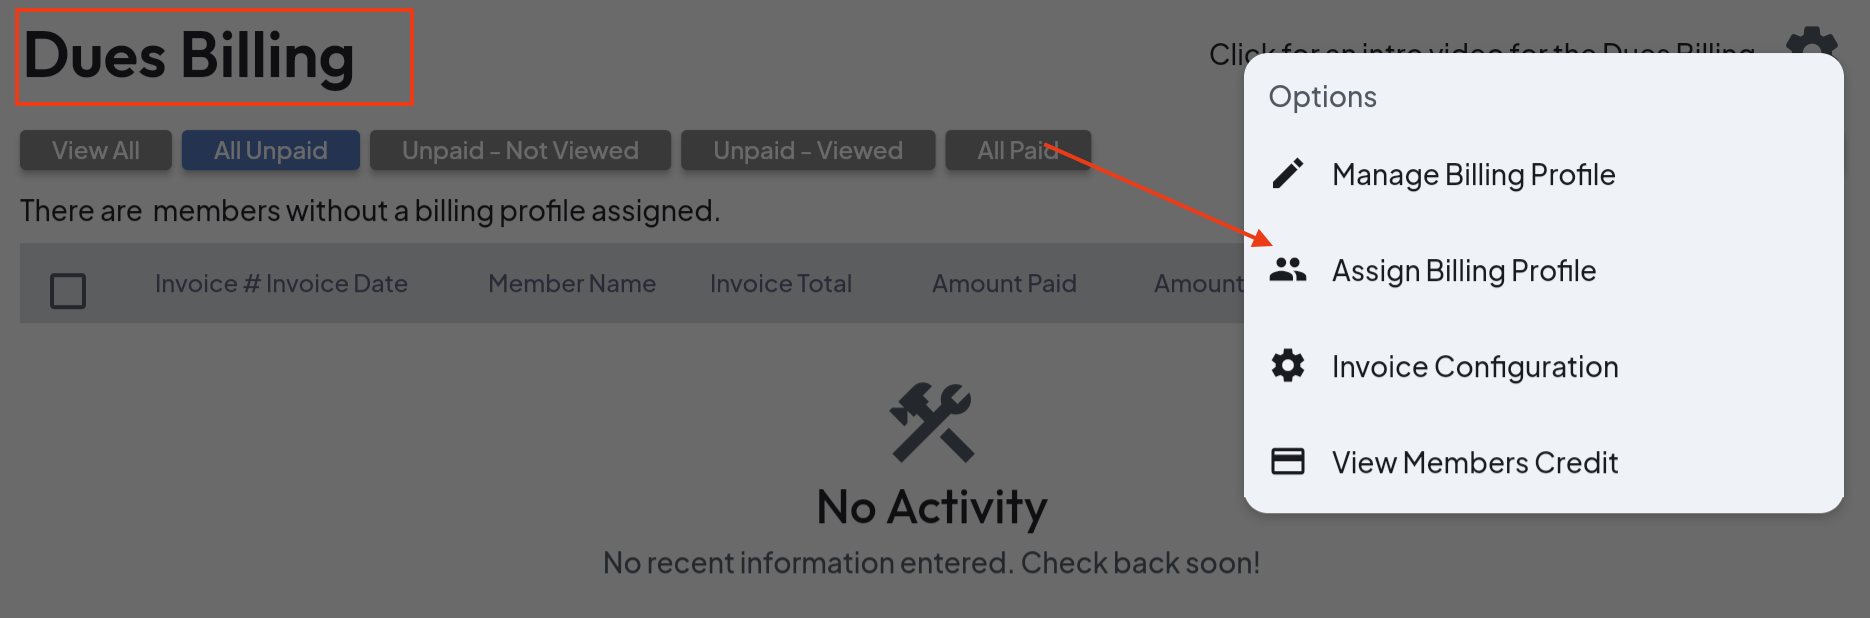
- To get started, navigate to the Dues Billing screen.
- Click on the "gear" icon located in the upper right corner.

- From there, select "Manage Billing Profiles." These profiles are assigned to members, simplifying the invoice creation process.
Creating a Billing Profile:
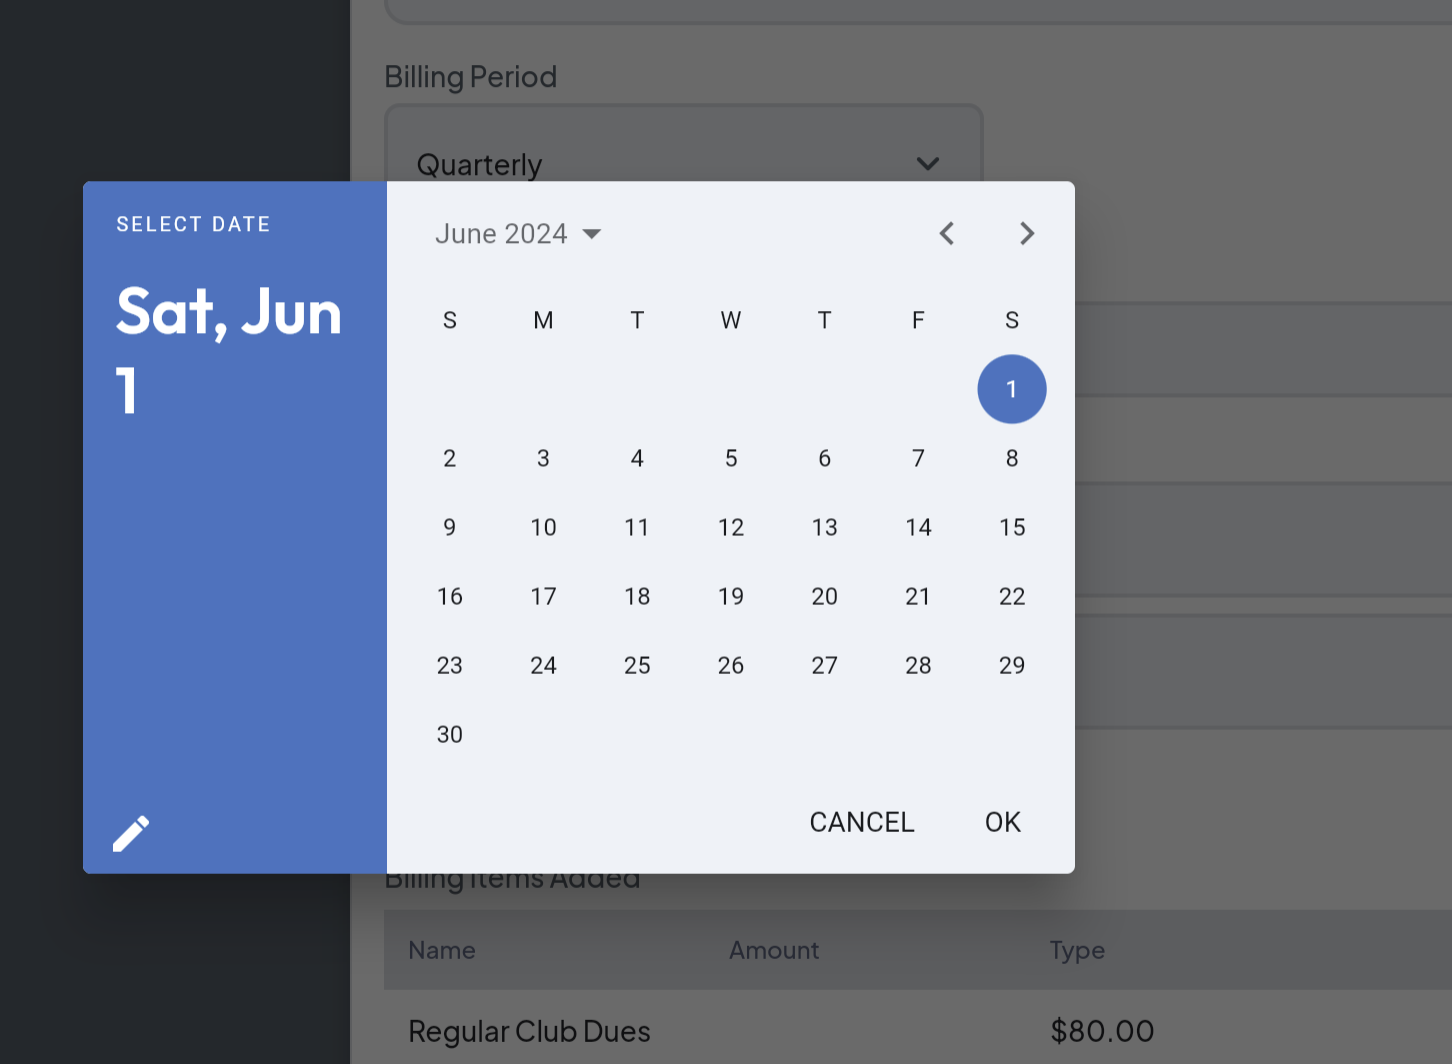
Next, you'll need to create a new billing profile. For this example, we’ll set up quarterly dues starting from June 1st.
- Click the blue “+” icon in the lower right of the screen.

- In the screen that shows, enter a "Billing Profile Name":
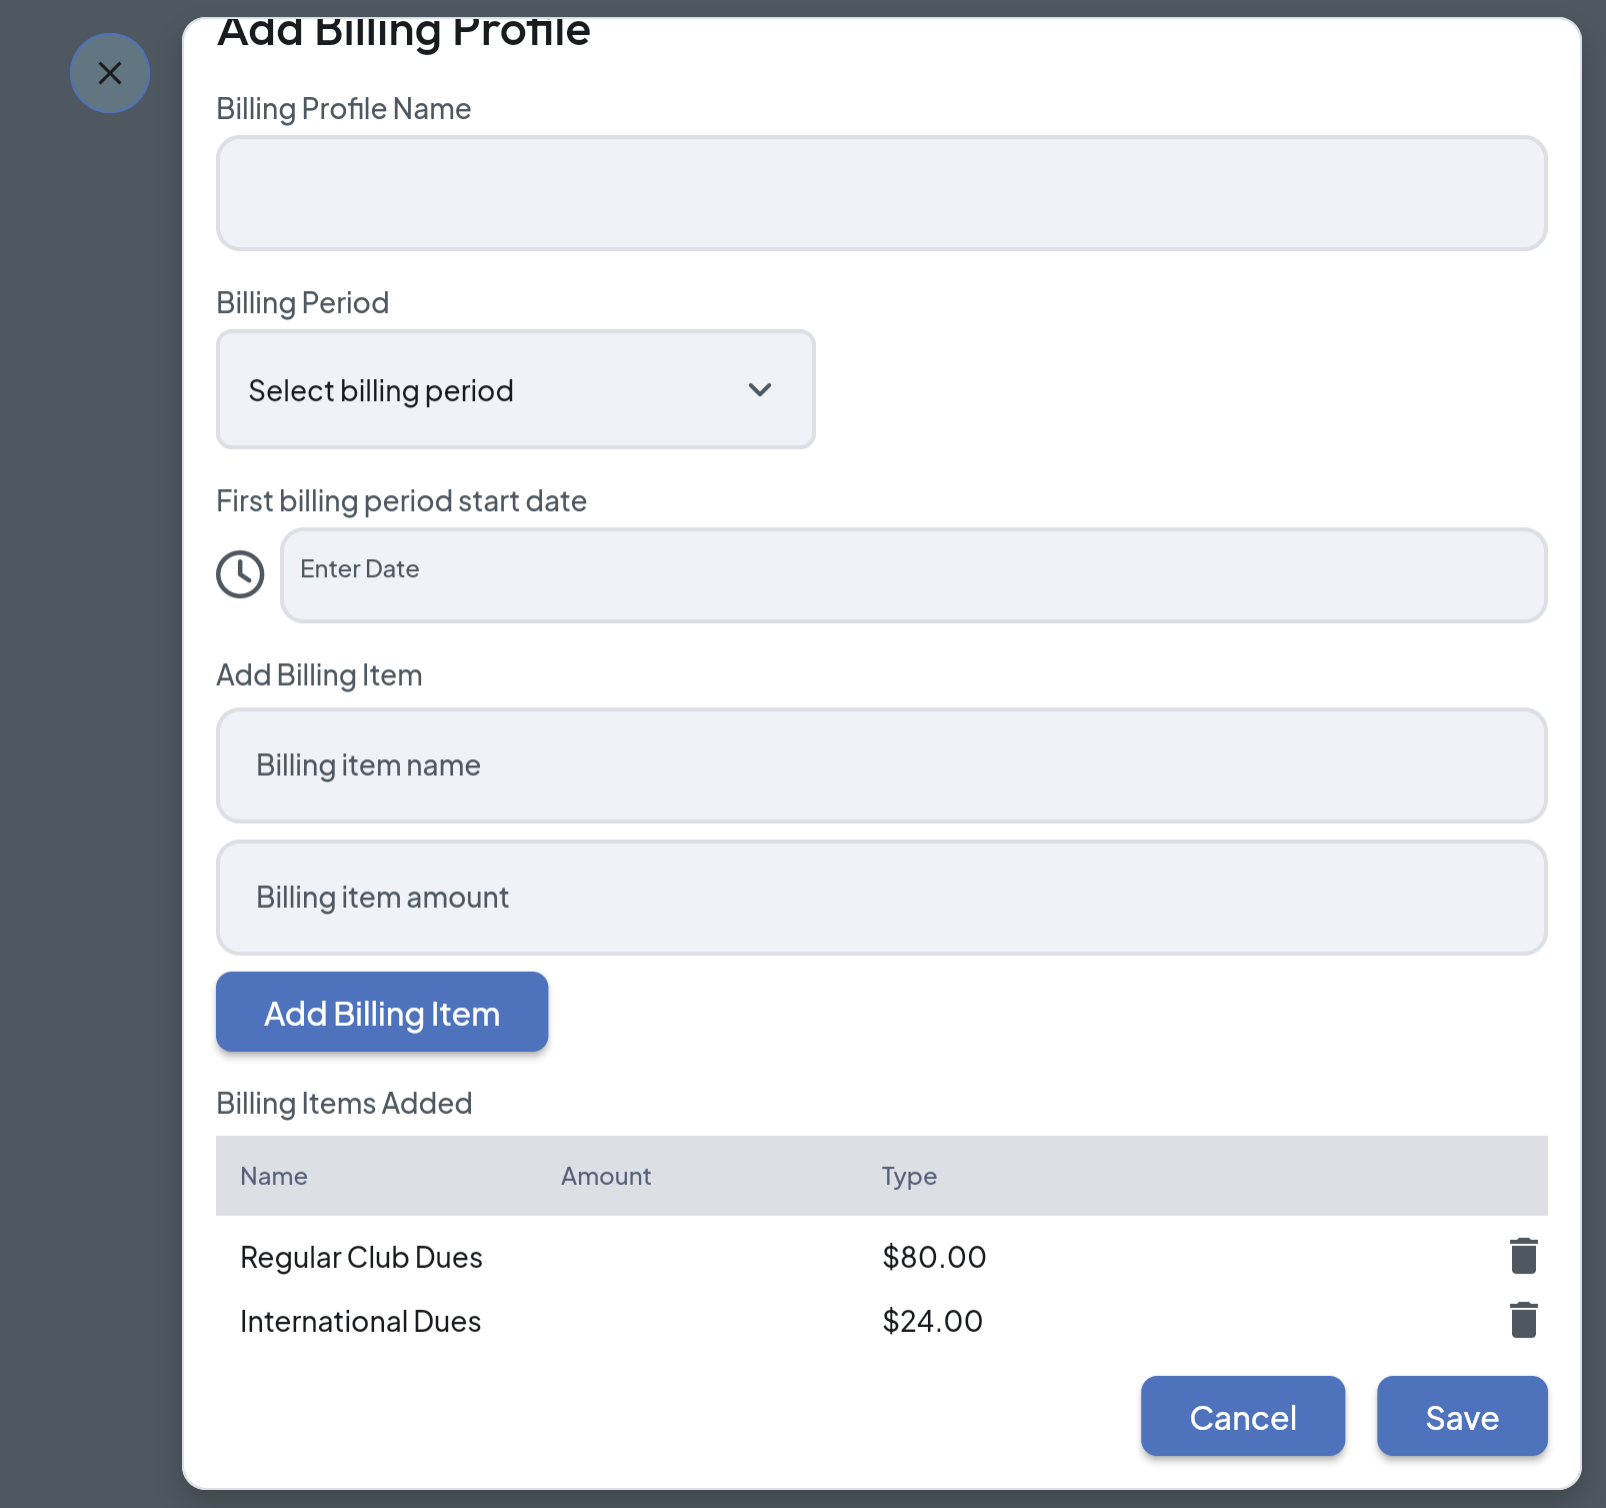
Note: Your club might have one billing profile that is the same for all members. However, many clubs will have different charges and amounts for different members. For example, a club might have Regular Member Billing, Senior Member Billing, Student Billing, etc. Set up a billing profile for each type.
Tip: Set up the billing profile based upon the member type and set the current (or upcoming amounts.) The next time you need to generate invoice, you can simple update the amounts in the billing profiles.
- Enter Billing Period.
- Click the “Clock” icon to the left of the First Billing Period Start Date textbook to select the first billing period start date. Then click “OK”.
- Under the "Add Billing Item" heading, add name of the billing item and the amount, then click “Add Billing Item”. If you need to add another Billing item repeat this step. Some clubs split out regular Club Dues and International Dues.
Note: Meals and Guest charges and attendance are added later in the process, when configuring the invoice.
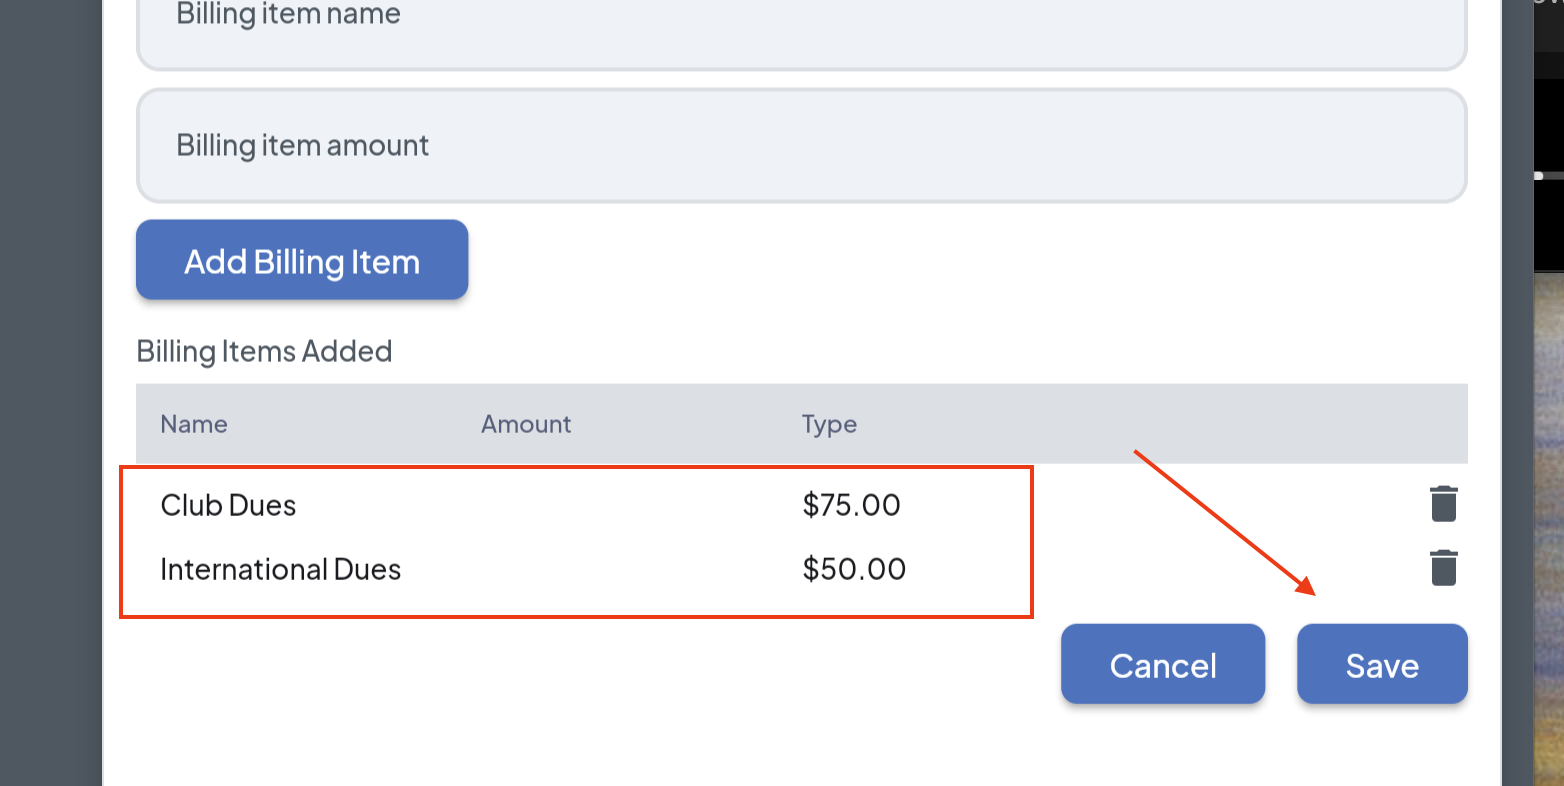
The added billing items appear at the bottom of the window:
- Click the “Save” button to continue.
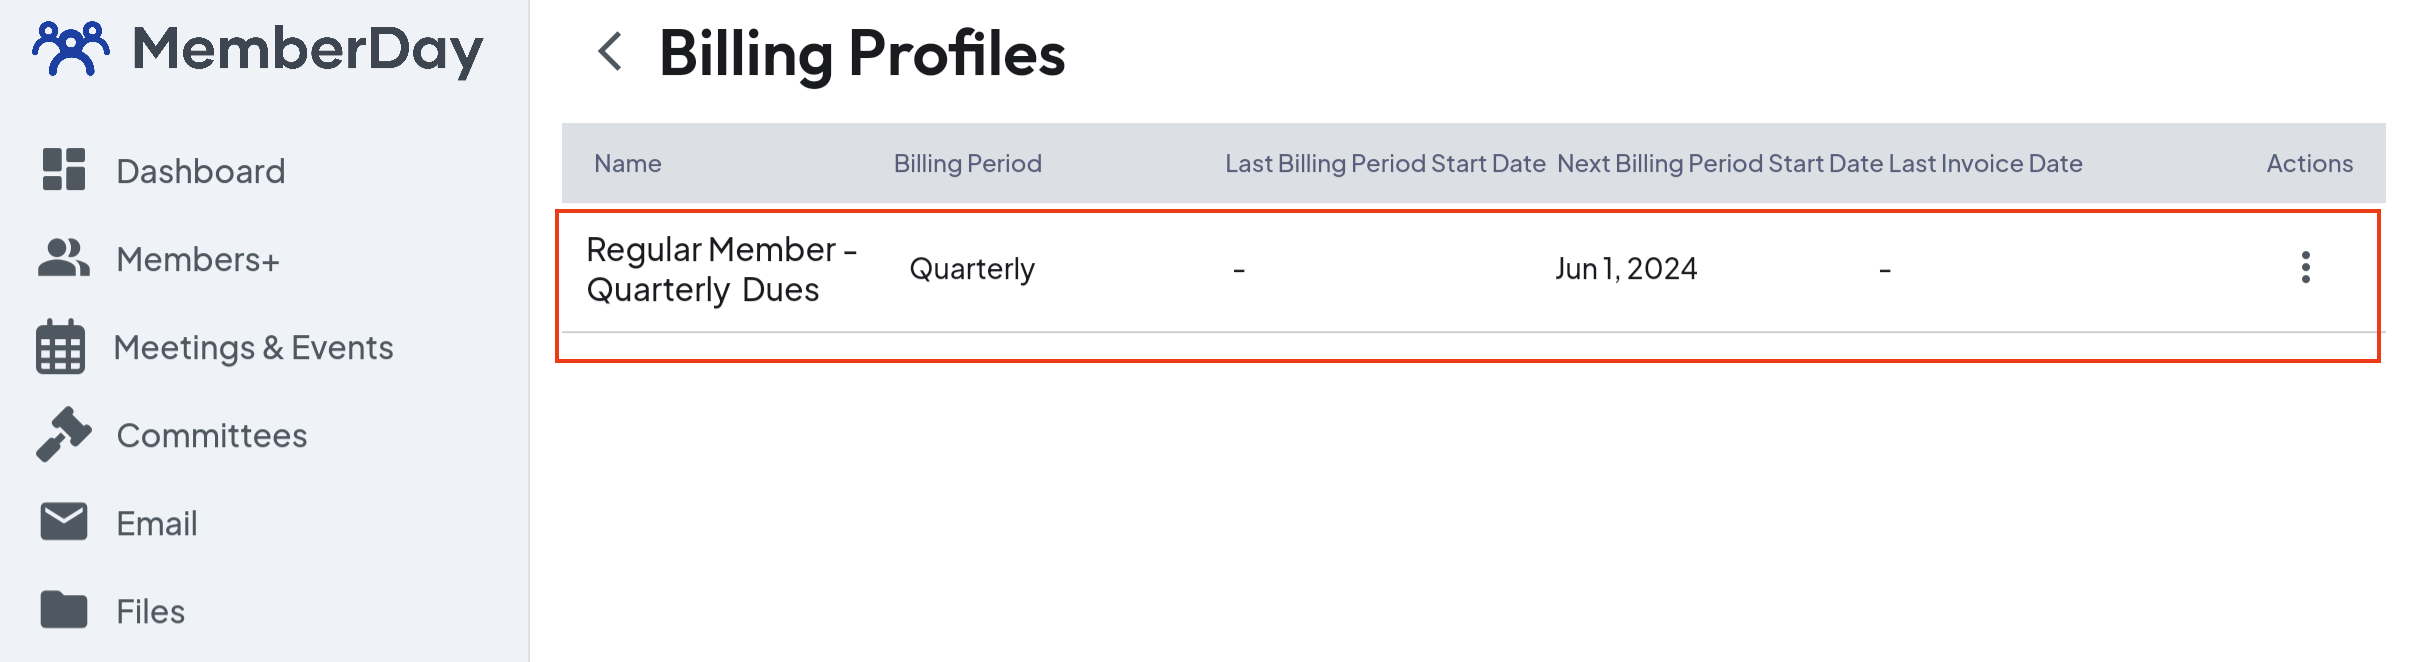
The newly added Billing Profile shows on the Billing Profiles screen:
Assigning Billing Profiles to Members:
Next assign the billing profile. Click the “Gear” at the top right of the window. If you do not see the “Gear”, click the “Dues Billing” tab to the right to navigate to the correct window.
In the popup that shows, select “Assign Billing Profile”. The list of members will show on the screen.
To assign individual billing profiles: Select the member name, then from the drop-down menu select the member profile needed. Click the blue checkmark to the right after making the selection.
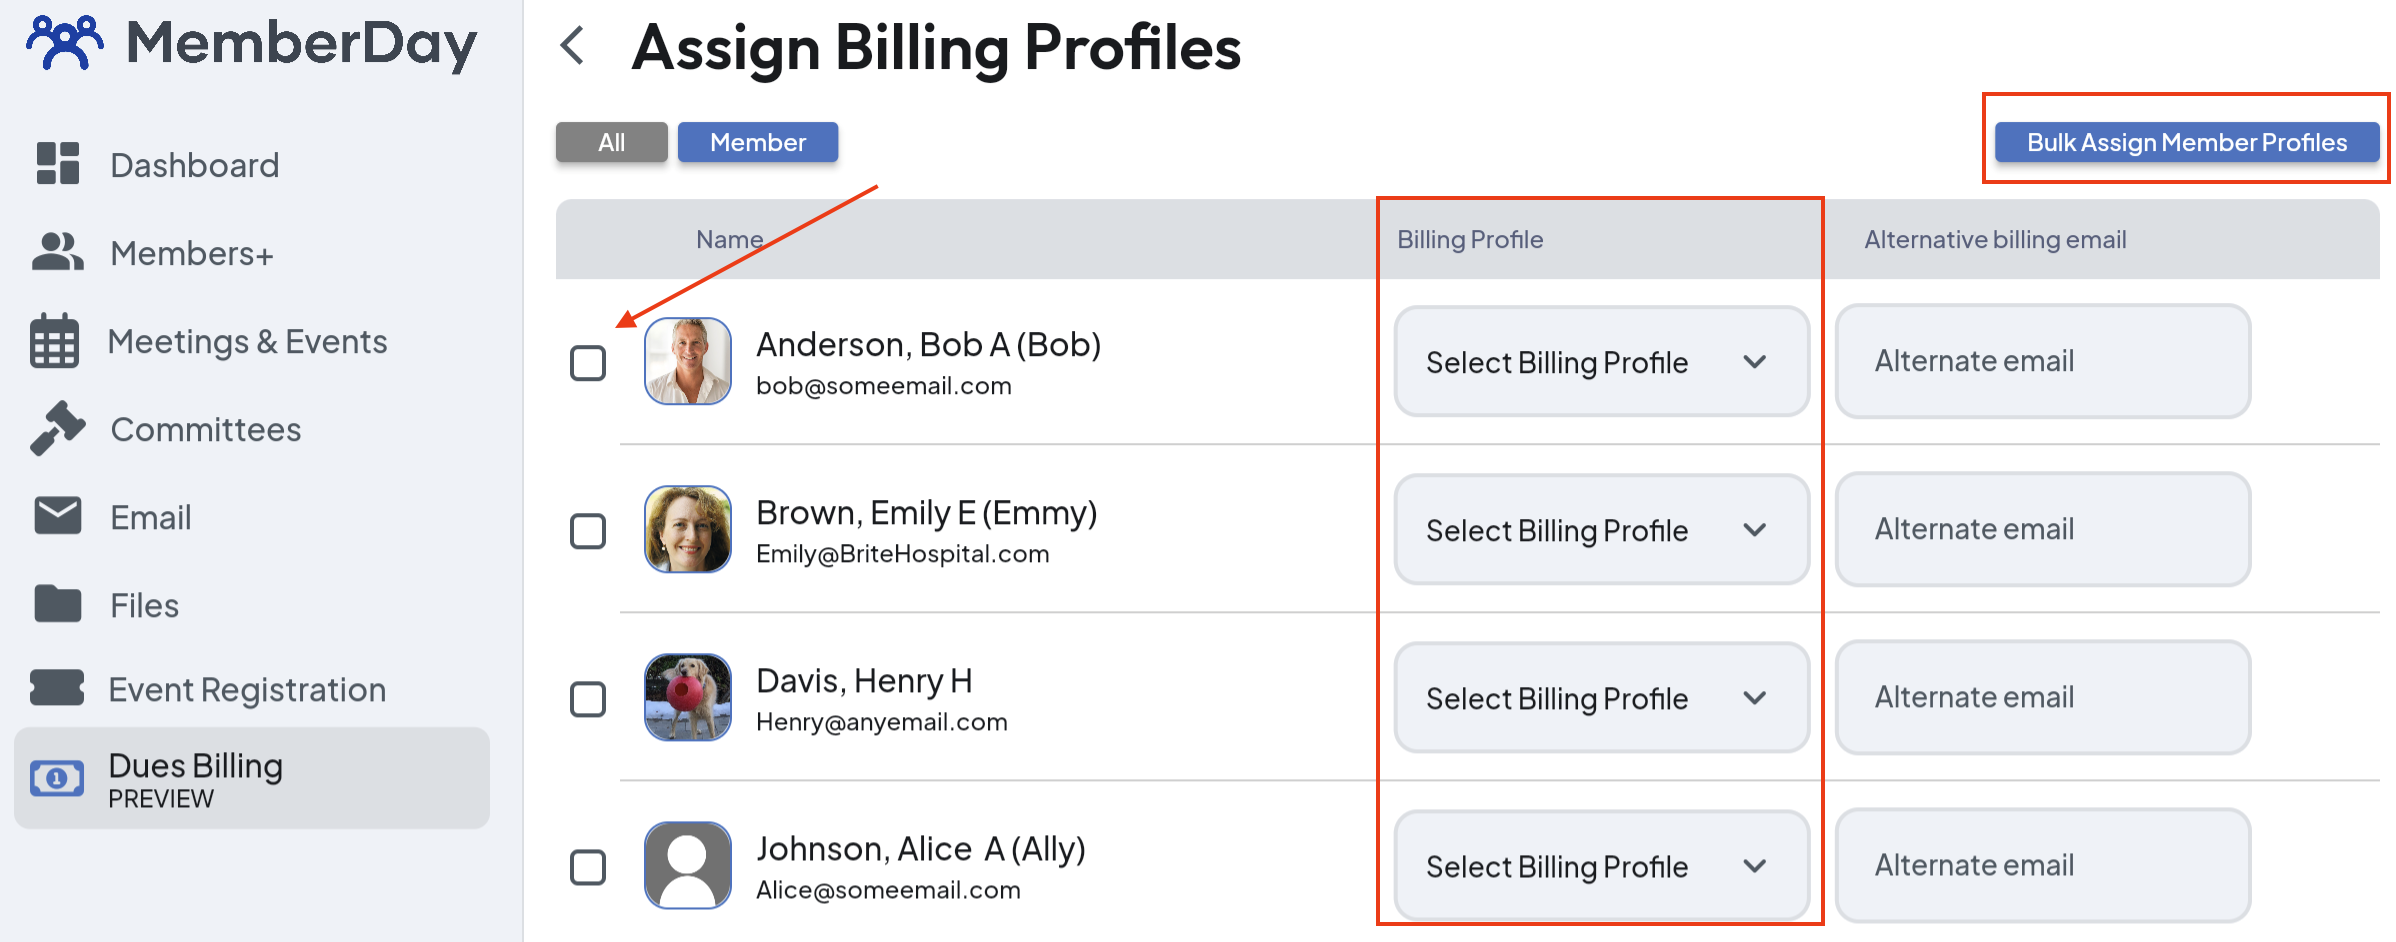
To Bulk Assign Billing Profiles:
On the “Assign Billing Profiles window, select the members that you would like to assign a billing profile, then click the “Bulk Assign Billing Profiles” button in the upper right of the window.
In the “Bulk Assign Billing Profiles” popup, select the Billing Profile from the drop-down menu, then click “Yes, Bulk Assign”.

- - - - - - - - - - - - - - - - - - - - - - - - -
2. Configuring Invoices (and Online Payments):
Next you'll configure the invoice.
- Click the “Gear” at the top right of the window. If you do not see the “Gear”, click the “Dues Billing” tab to the left to navigate to the correct window.
- In the popup that shows, select “Invoice Configuration”. The Invoice Configuration popup box will show:
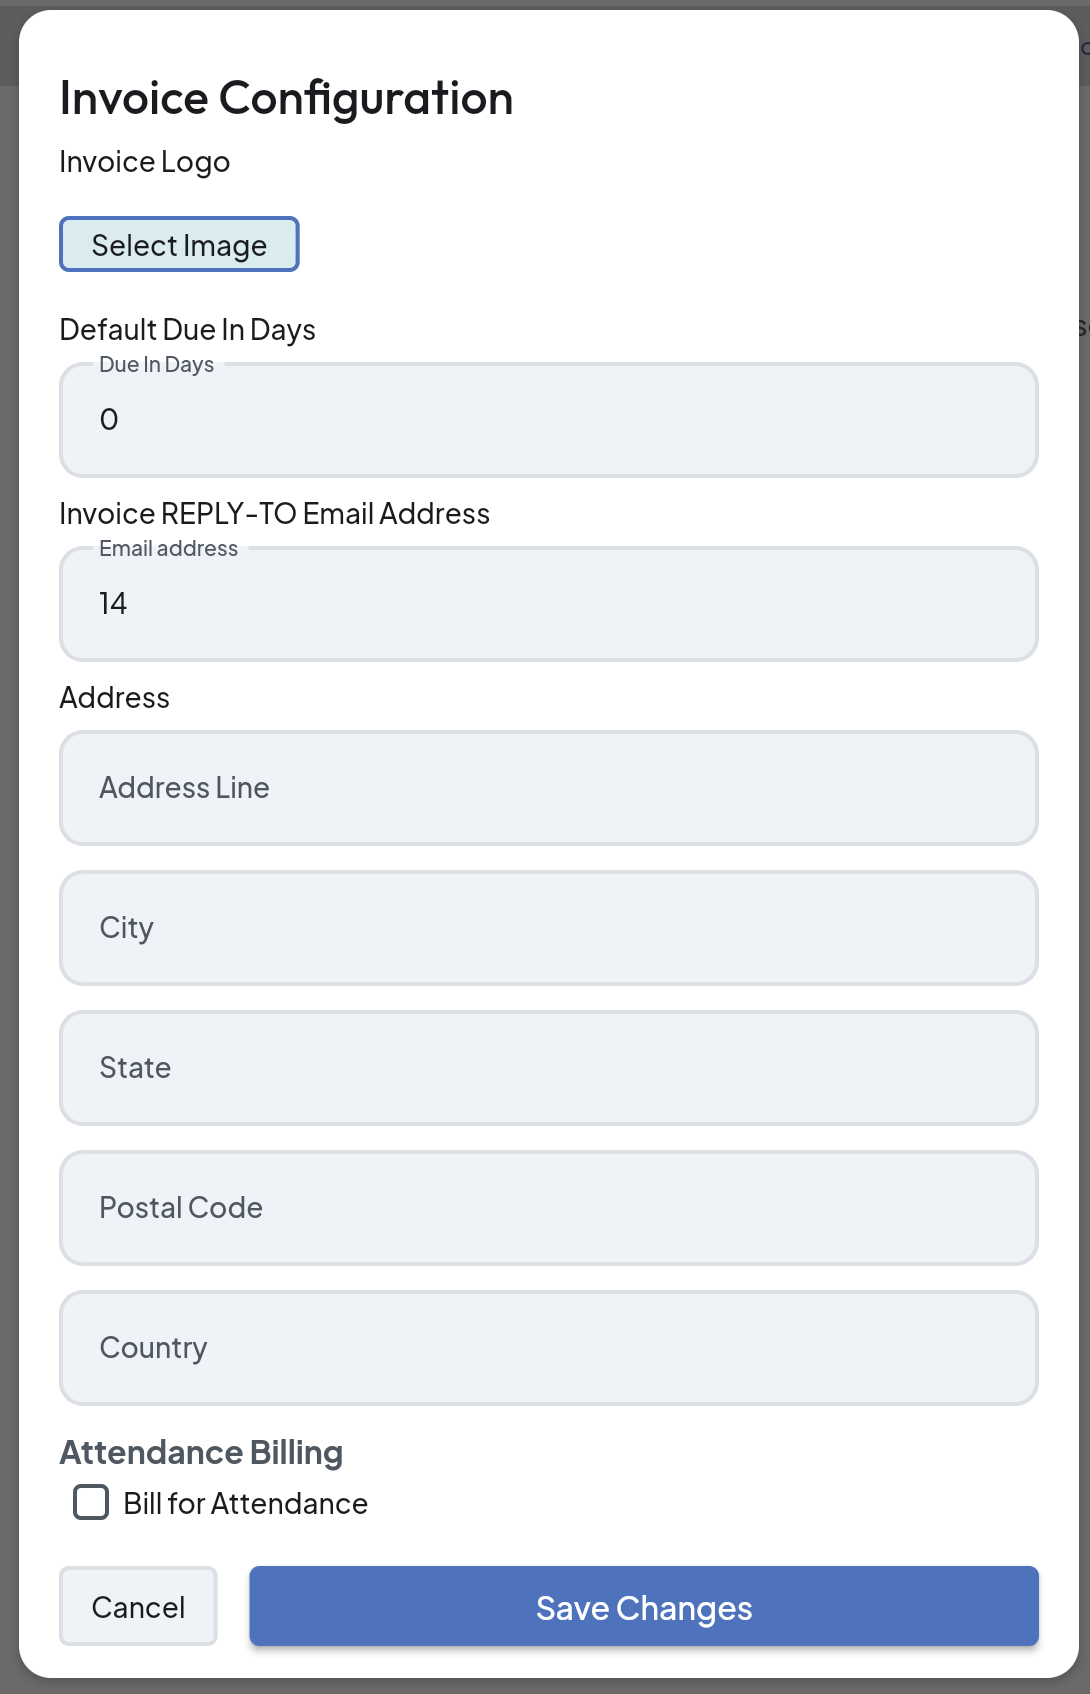
Logo, due date, club address
- Here you can add can upload an image for the invoice by clicking the "Select Image" button. NOTE: The Image must be less than 100k and approx 50 pixels in height!
- Next, set default parameters such as due dates, reply email and club billing address.
Attendance
- Click "Bill for Attendance" if you want to bill for attendance at meetings. This feature automatically calculates attendance fees based on specified periods.
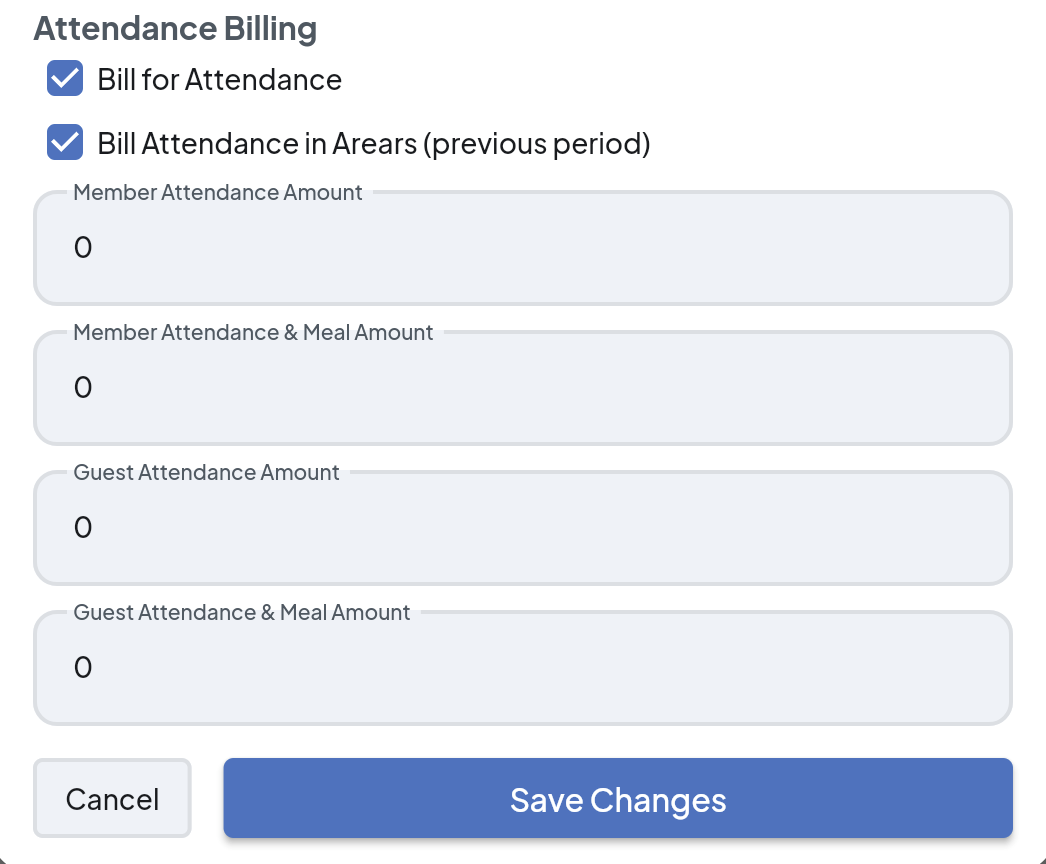
- Click “Bill Attendance in Arrears (previous period)”, if needed. For example if this invoice is for the 2nd quarter, the system will look at the attendance for the previous quarter. This will be the typical scenario.
- Enter in values for “Member Attendance Amount” and “Member Attendance & Meal Amount”. When the invoice is generated, it will select one of these based upon if the member had a meal or not. For example, Linda attended two meetings in the given period. One meeting she only attended and didn't have a meal, and the other she had a meal. If the Member Attendance Amount is configured as $5 and the Member Attendance & Meal Amount is $10, then she would be billed $15.
- Enter values for “Guest Attendance Amount” and “Guest Attendance & Meal Amount”. The same logic will apply for guests as it did for members.
Online payments
NOTE: The MemberDay Member Portal uses Stripe to receive and process payments. If you have not signed up for or connected an existing Stripe account, first go to the Dues Billing main screen and click the "Gear" icon in the upper right. Choose "Online Payments" and select the appropriate option.
Then back on the Invoice Configuration screen:
- Click "Enable online payment".
- Enter in a service fee that will be added to the invoice if it is paid online (optional)
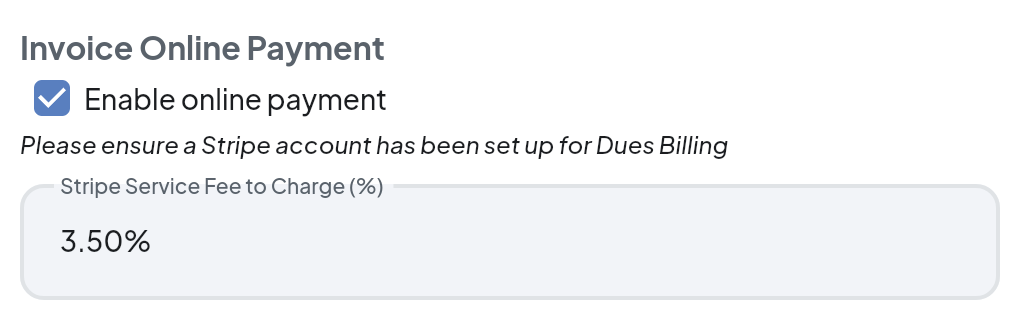
- Click “Save Changes”.
- - - - - - - - - - - - - - - - - - - - - - - - -
3. Managing Attendance:
Note: At this point it is assumed that you have been using the attendance tracking feature of MemberDay. If you need assistance with attendance tracking you can view this article:
This section is only applicable if you track and bill for attendance, meals, or other fees at meetings or events.
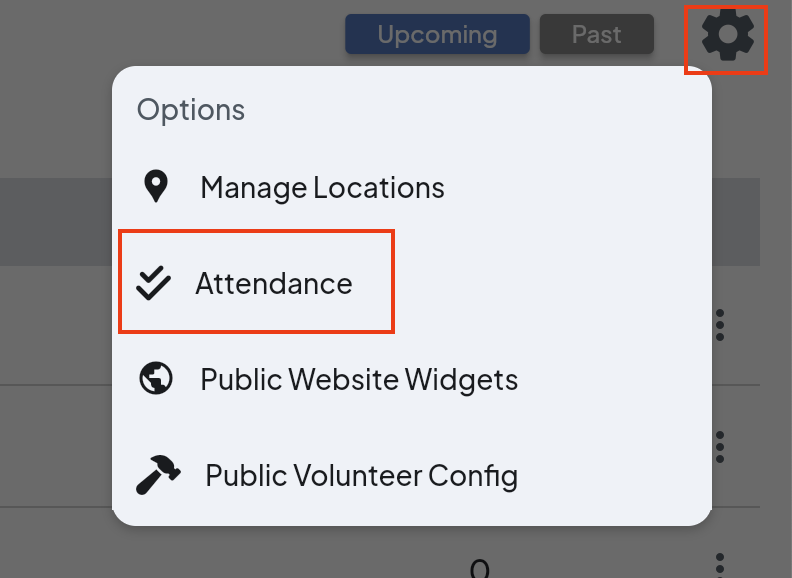
- Click the “Meetings & Attendance” tab in the left menu.
- Click the “Gear” in the upper right and select “Attendance”:
- At the top of the window choose filters from the drop-down menus. For this example, we chose “Regular Meetings”:
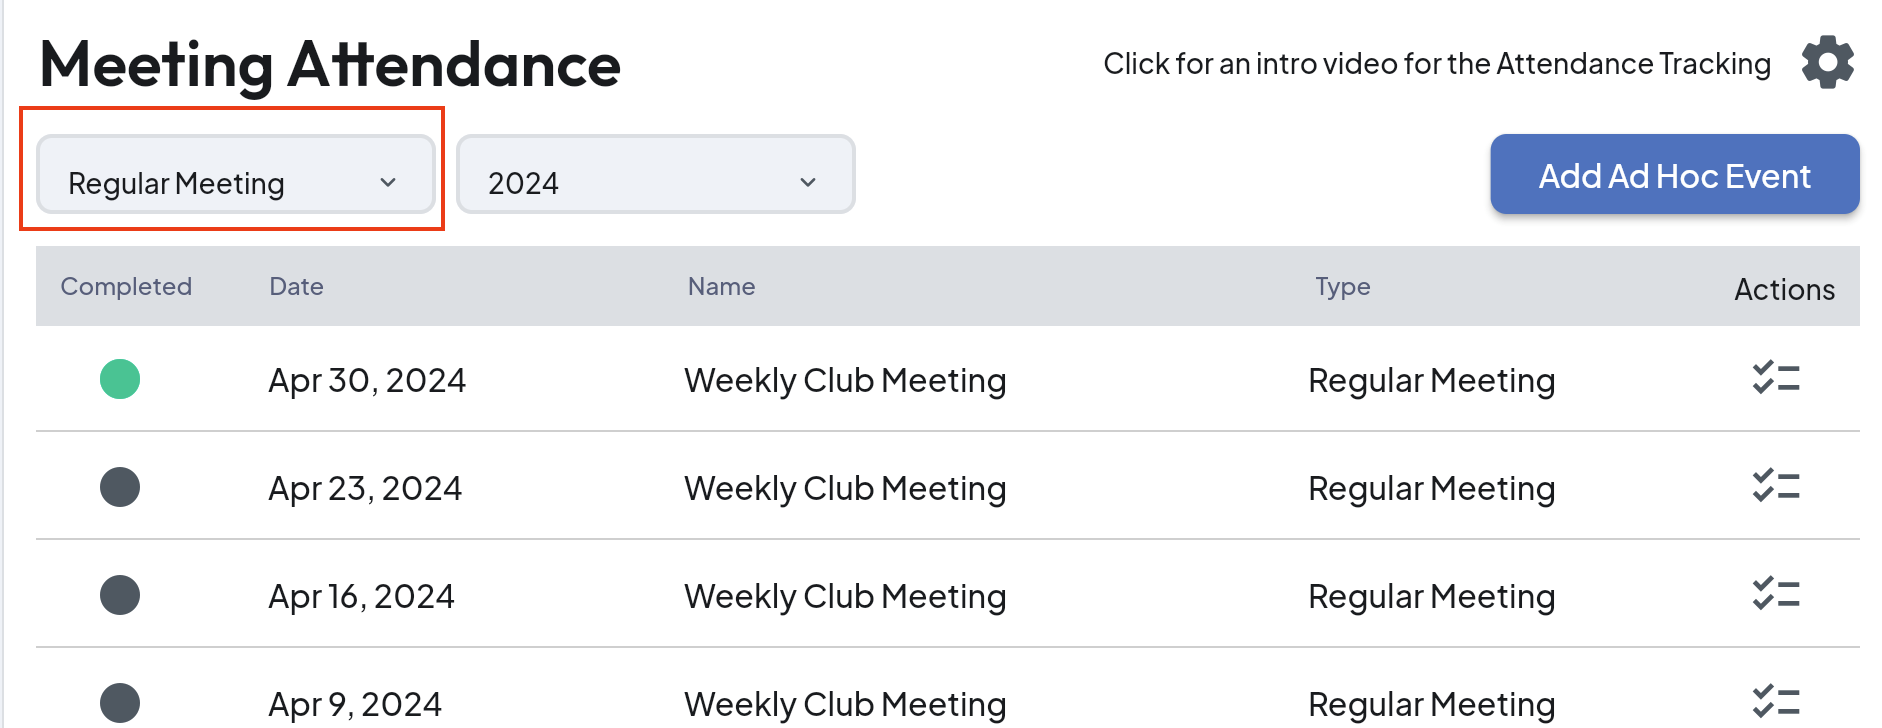
- Consider spot checking to ensure that attendance has been tracked for each meeting to be included in the invoice.
- Click in the row of the meeting under the "Actions" heading to view attendance for a specific meeting.
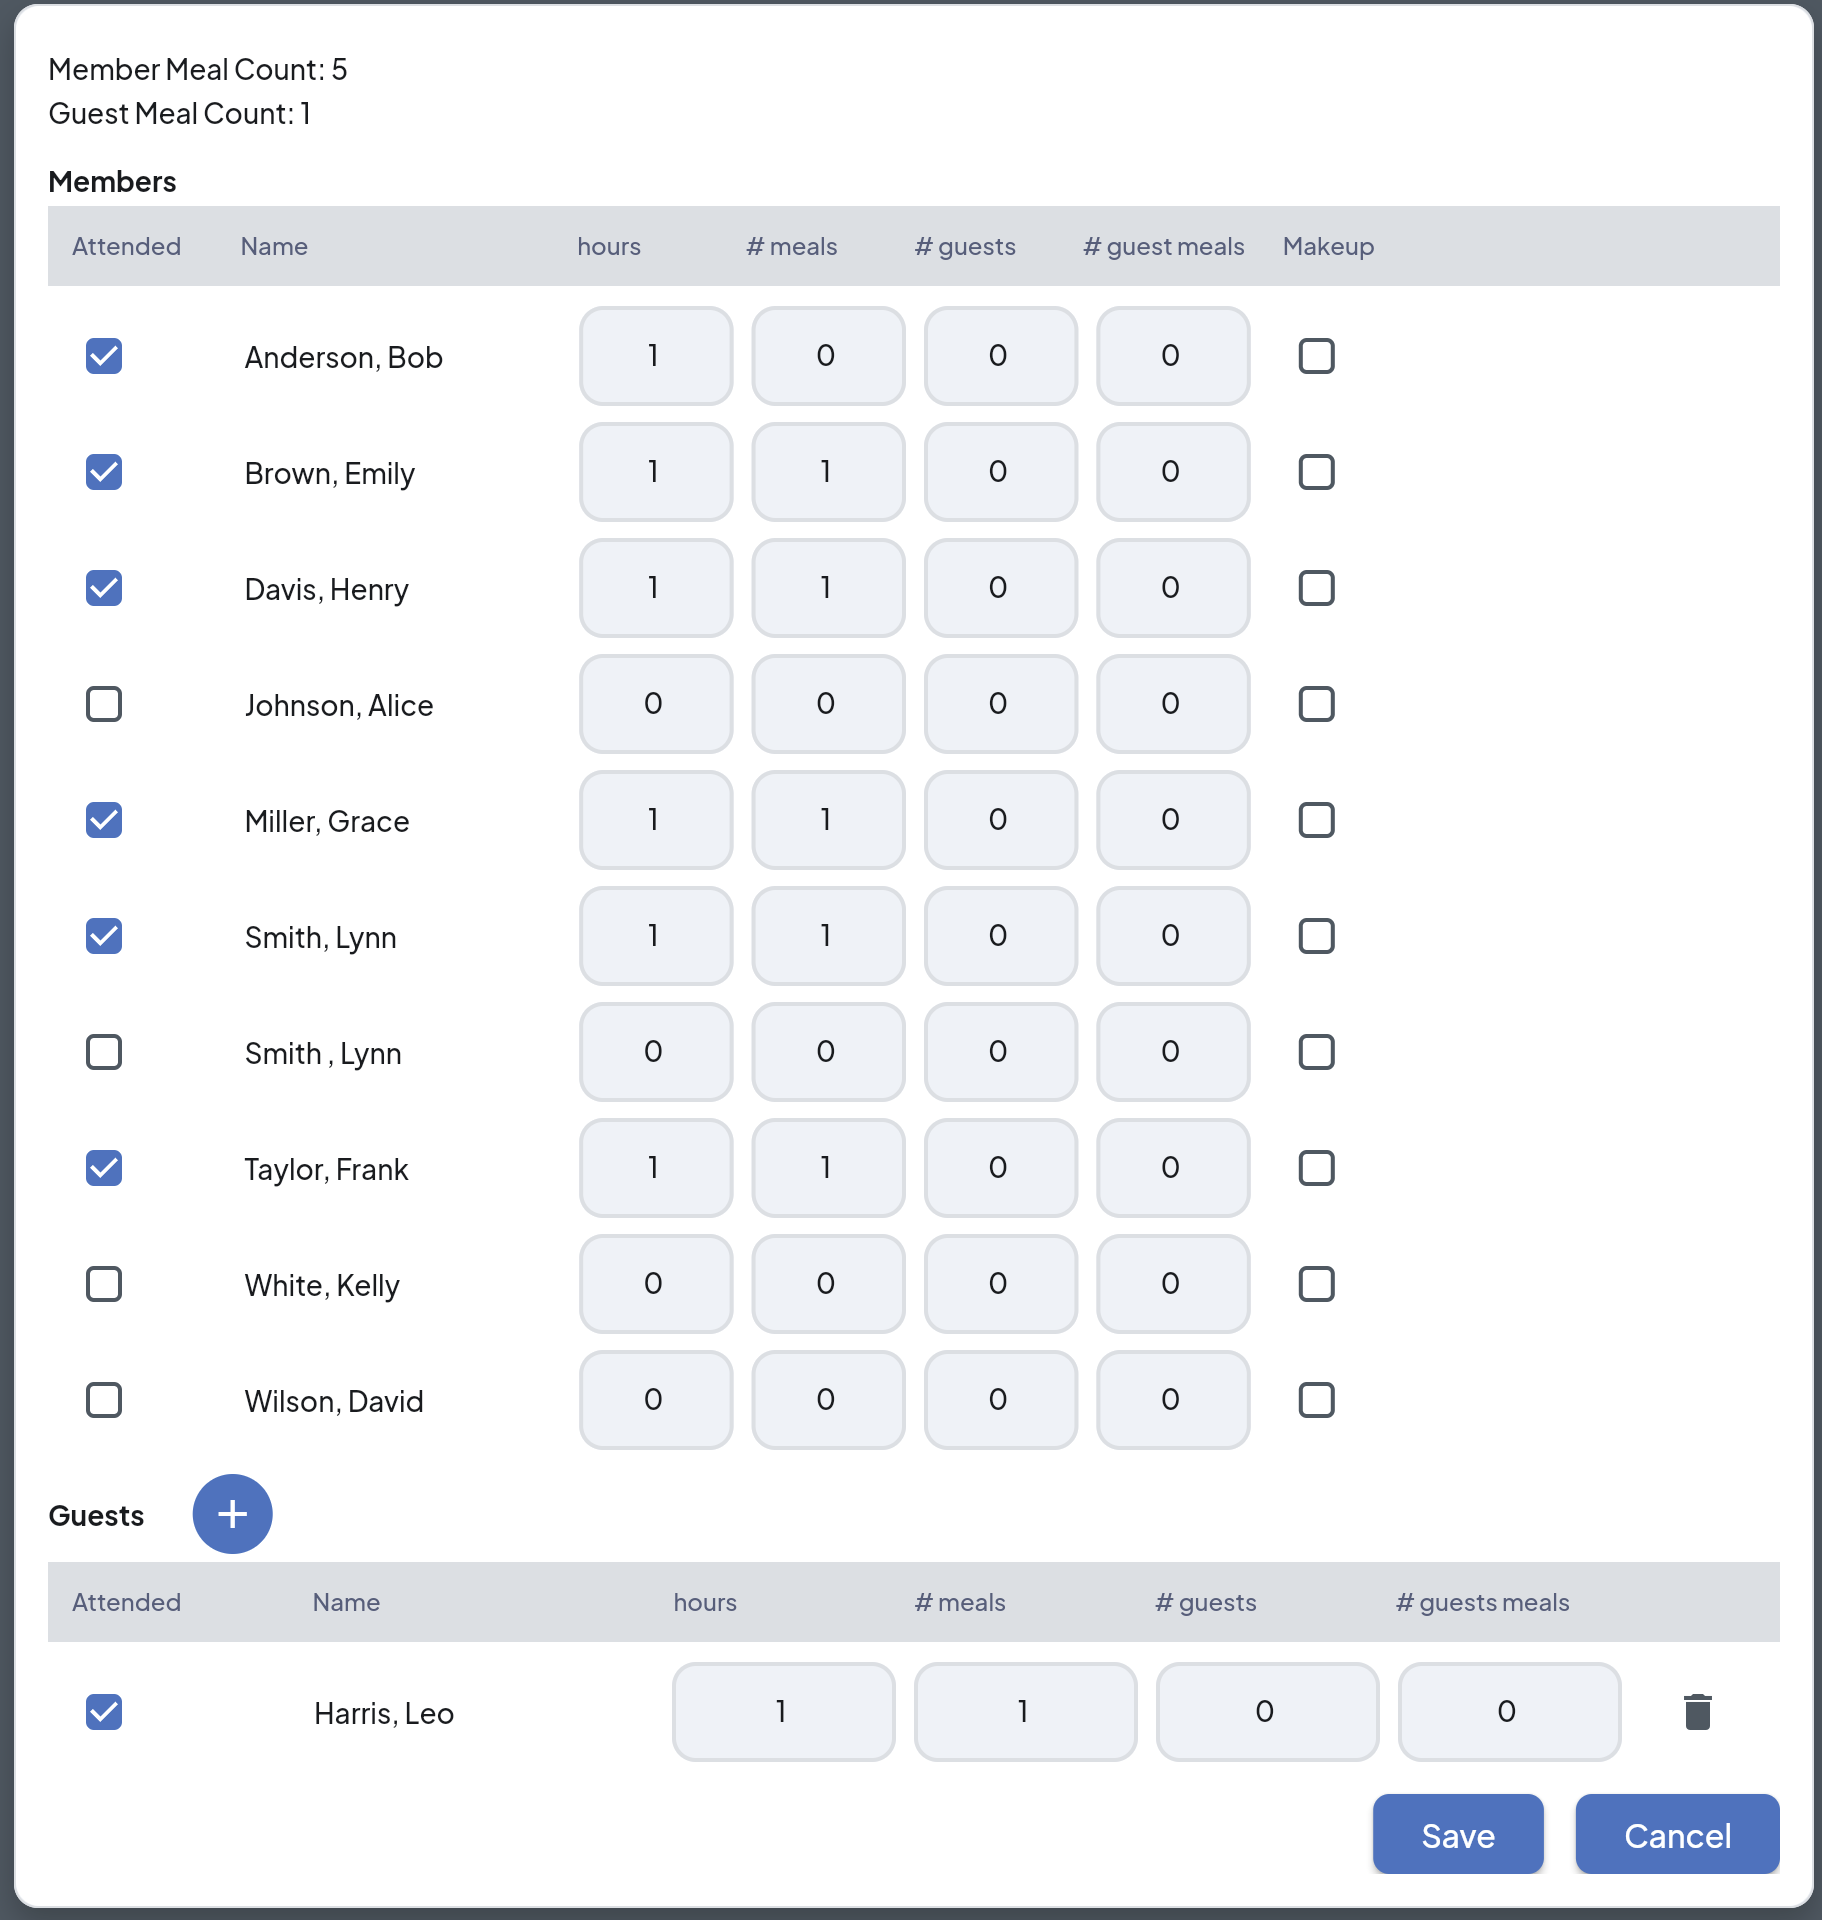
Attendance fees can vary based on whether members attended events or signed up for a meal. You can assign different amounts for attendance and meal charges. Our system simplifies the process by automatically calculating the total attendance fees for each member.
- - - - - - - - - - - - - - - - - - - - - - - - -
4. Generating Invoices:
Once you've configured the billing profile and attendance settings, it's time to complete the billing process by creating invoices.
- Click the “Dues Billing” tab in the left navigation menu.
- Click the blue “+” icon.
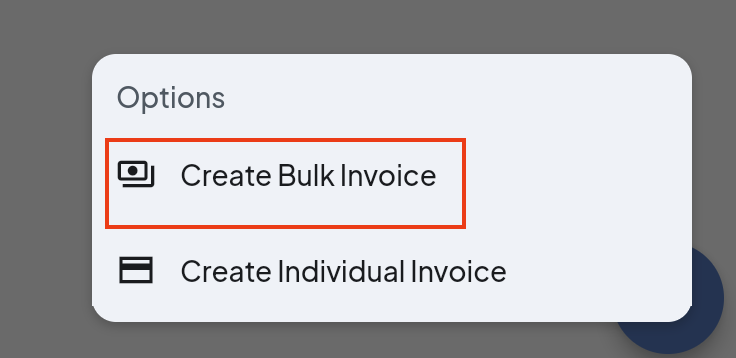
- From there click "Create Bulk Invoice" or "Create Individual Invoice" based on your need.
To send or create invoices for an entire billing profile group:
Use the bulk action feature to create invoices for multiple members at once.
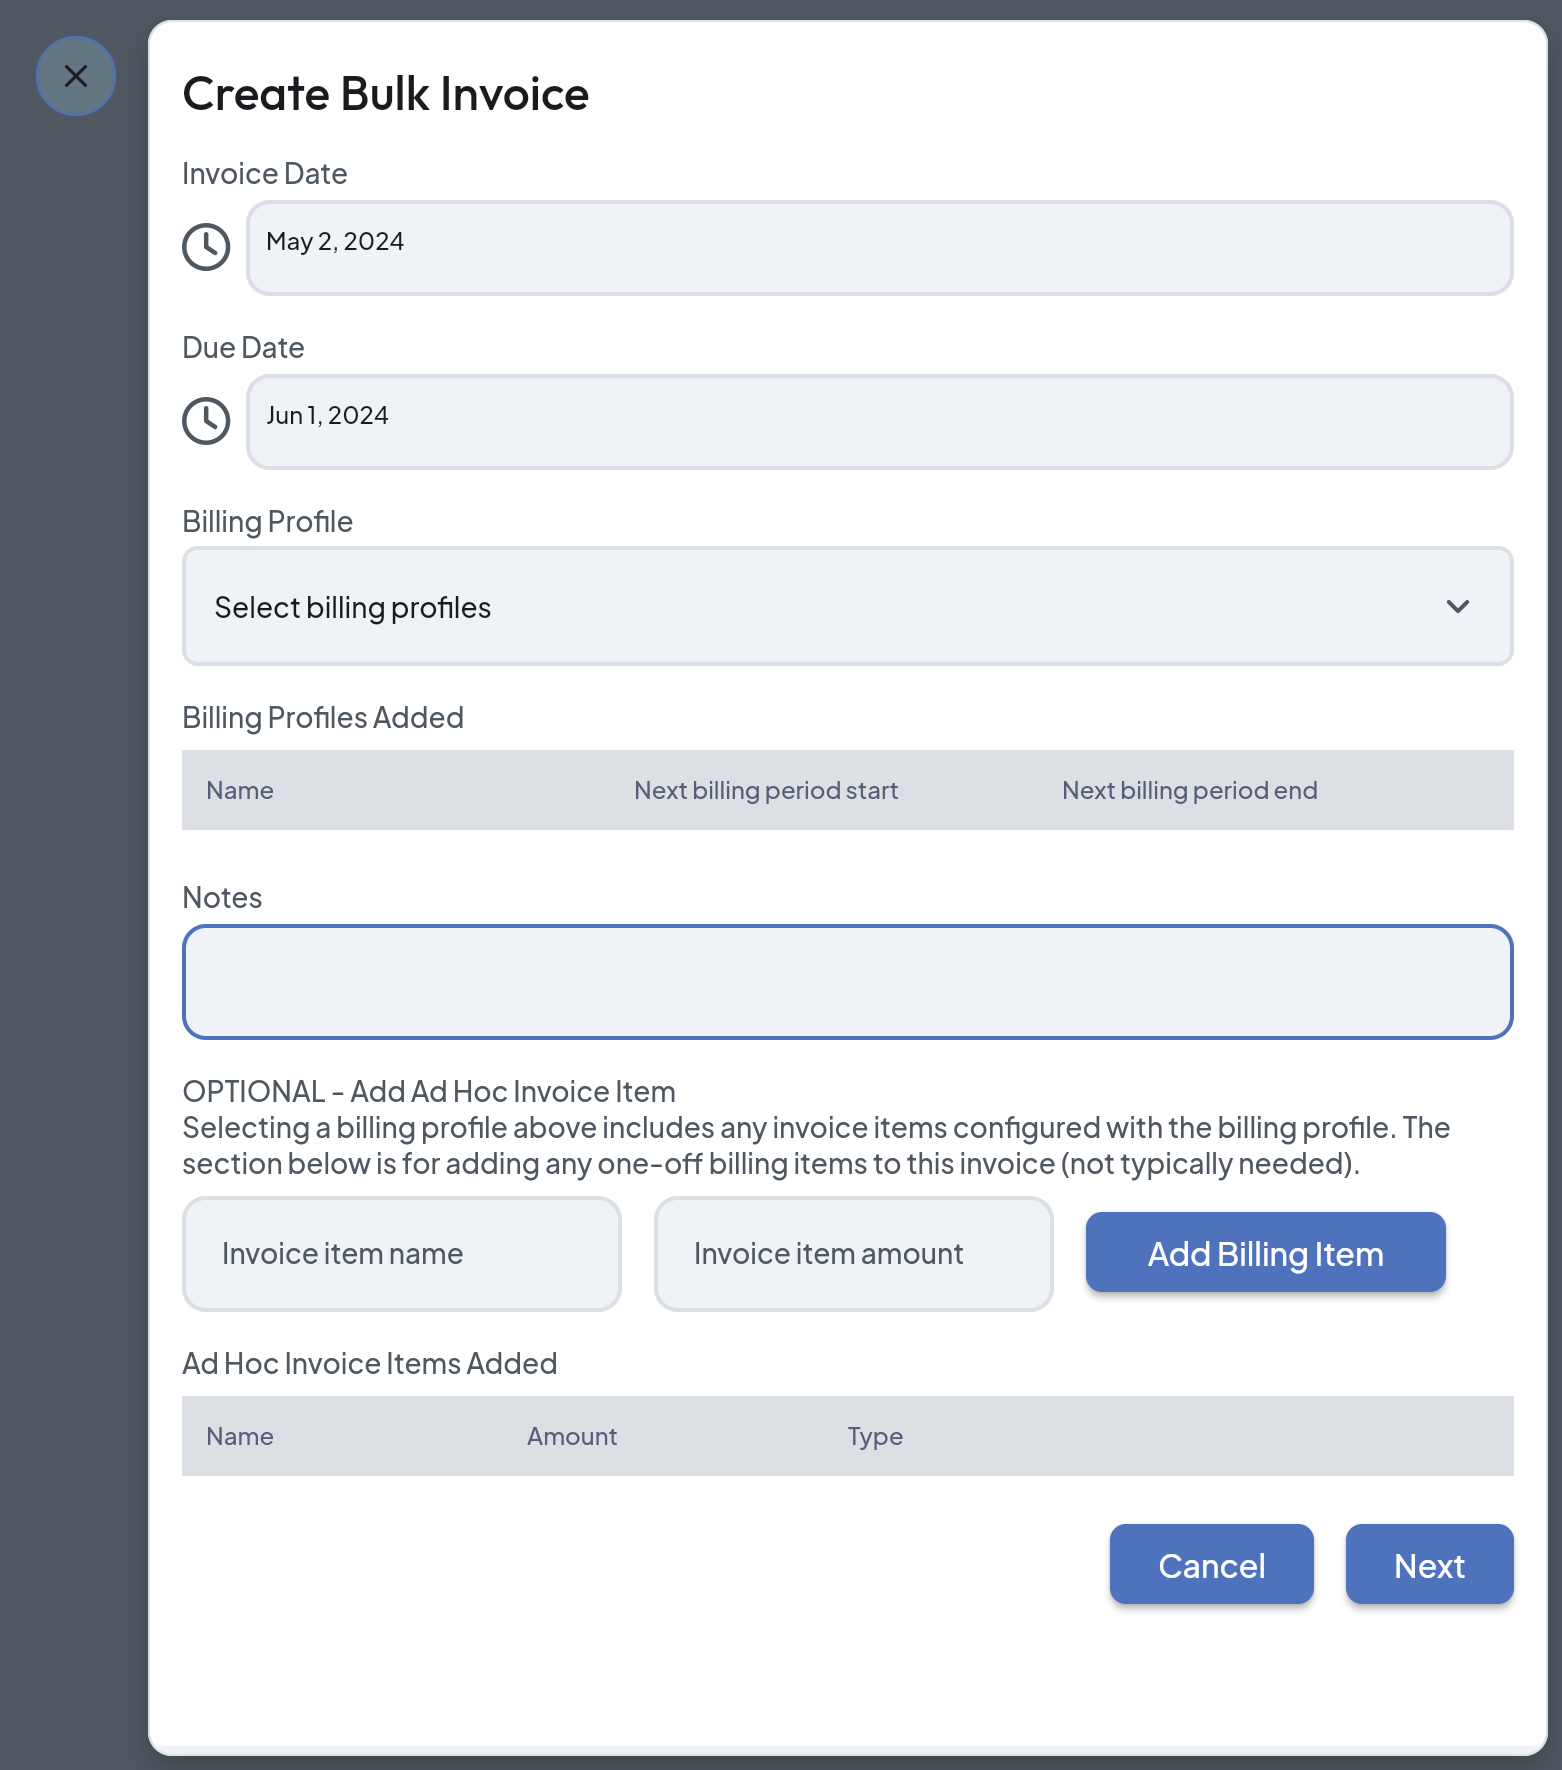
- Select the "Invoice Date" and enter the "Due Date".
- Select the “Billing Profile” from the drop-down menu (e.g., quarterly dues). Once selected the billing profile will show under the “Billing Profiles Added” heading.
- In the Notes box add in any message that you would like to include on the invoice. For example, you might add a note, “Thank you for being a part of our club; we appreciate you!”
- To add Ad Hoc items to the invoice, enter the item name (for example, "Birthday Fund for Members") and the item amount, then click “Add Billing Item”. The item will show under the "Ad Hoc Items Added" heading.
- When finished, click “Next”.
- The "Review Bulk Invoice" popup box will show:
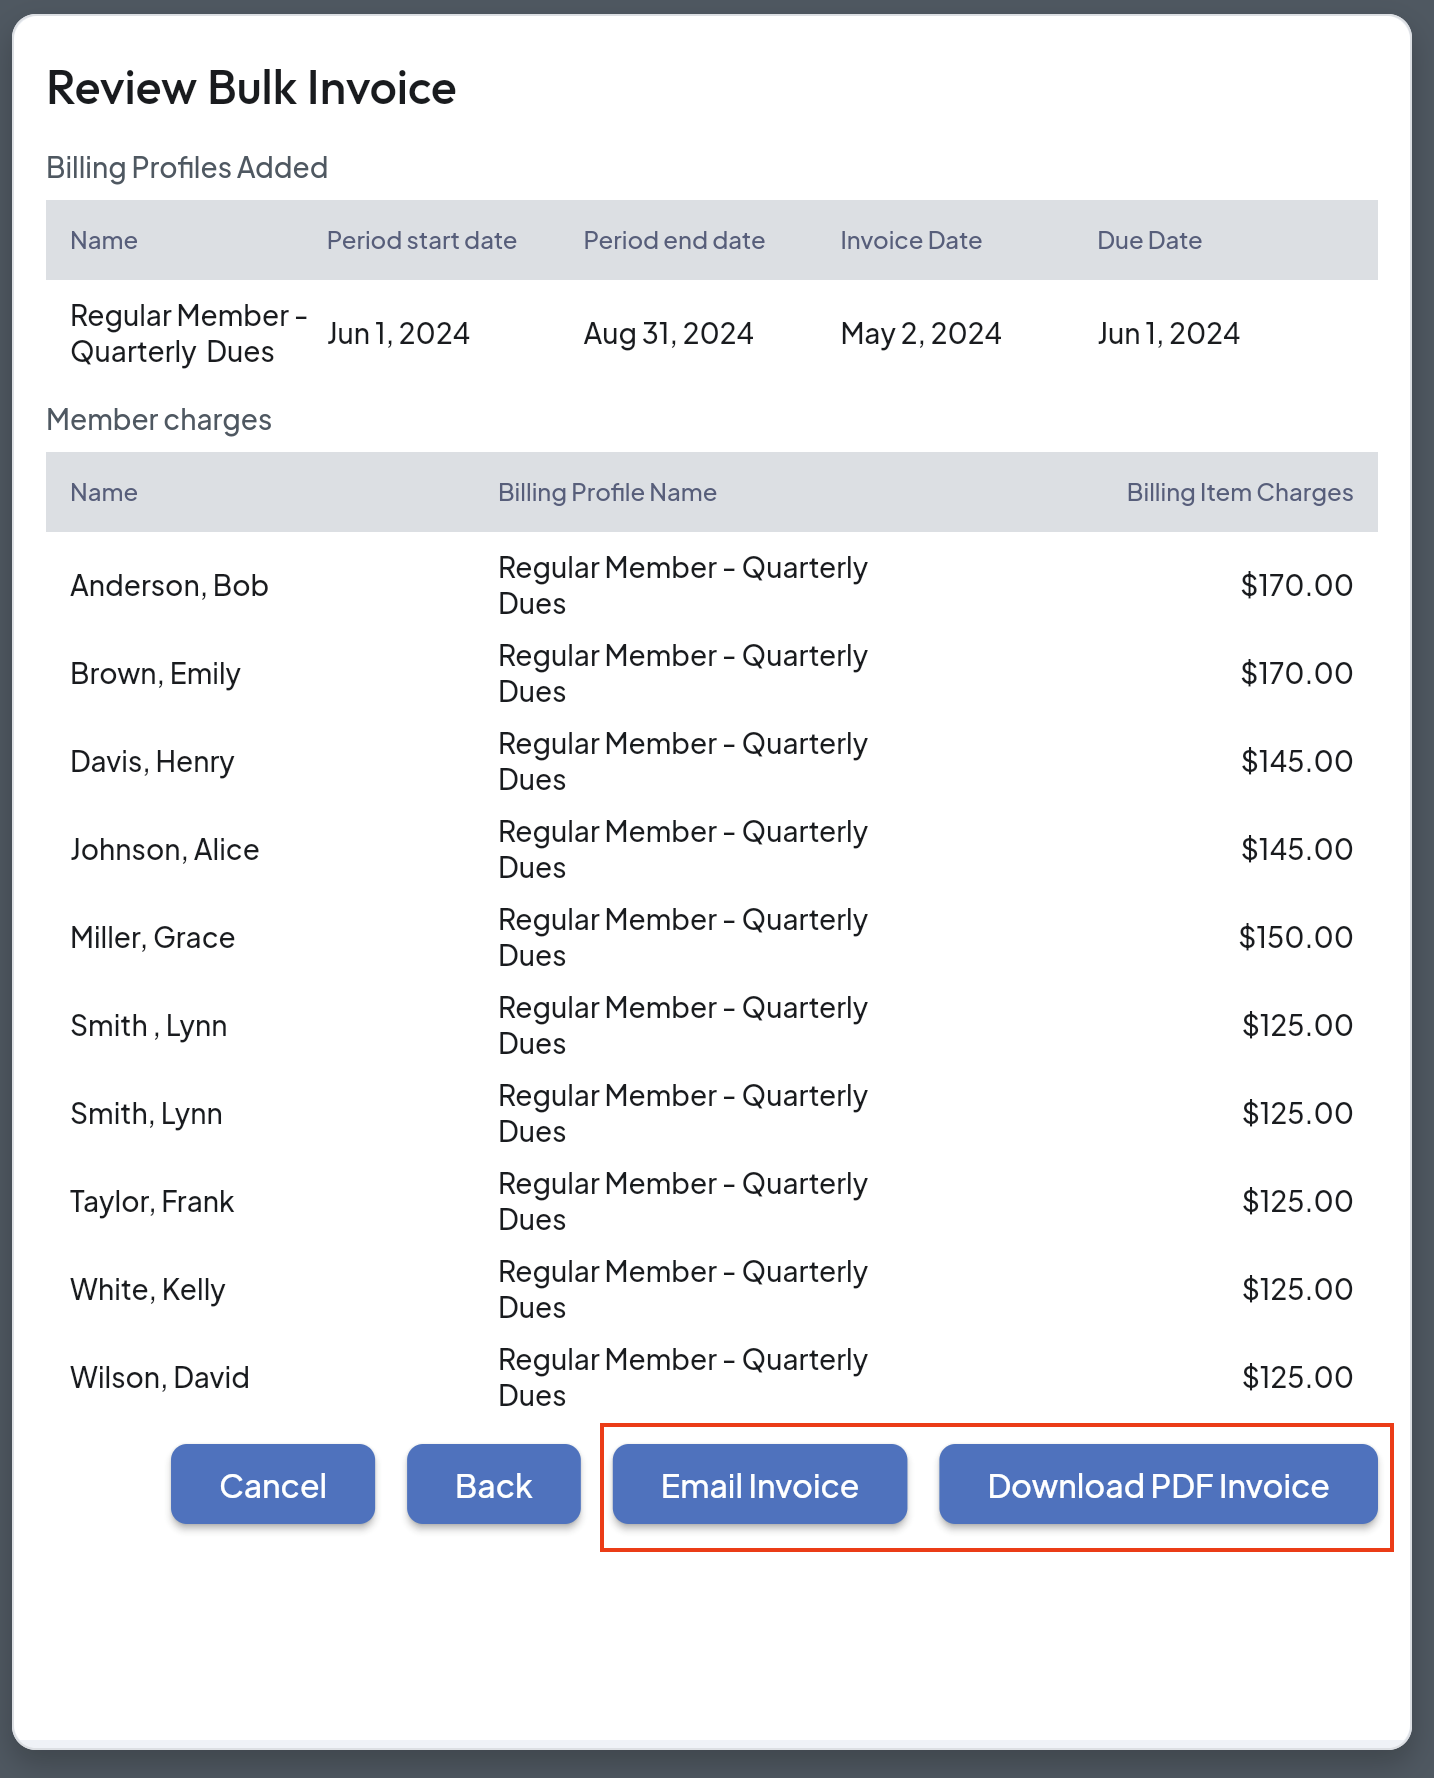
- Each member that was assigned the billing profile(s) selected will show in the list.
- At the bottom of the popup box, choose “Email Invoice” or “Download PDF Invoice” depending on which is needed. (See above.)
If Invoices Were Emailed - The member will receive an email with a link to view the invoice. The member can then download a pdf copy of the invoice.
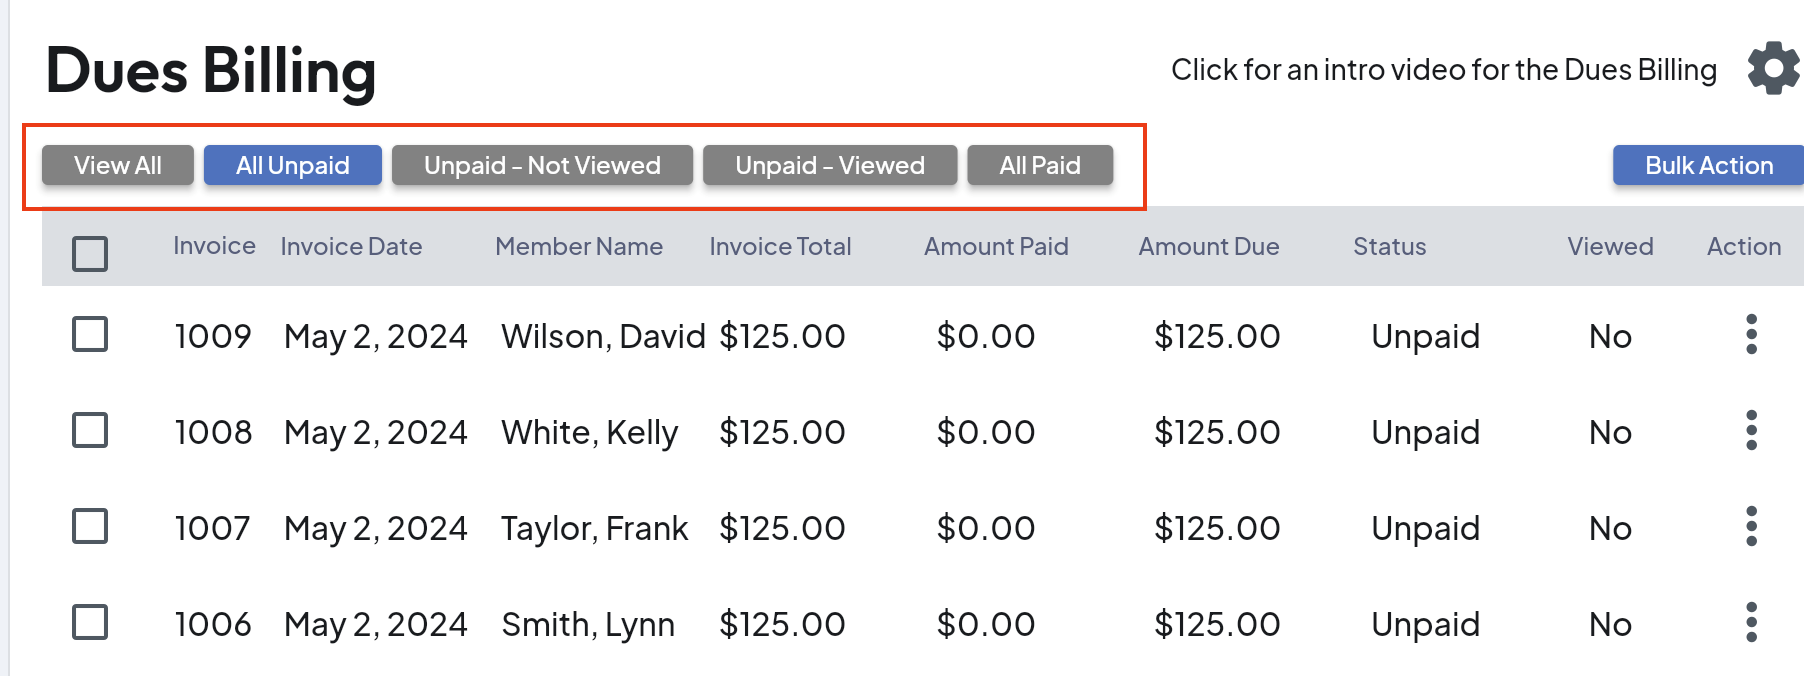
The screen will return to the Dues Billing page with a list of invoices generated.
- Filter and view by categories if desired by clicking on the buttons across the top of the window: All, All Unpaid, Unpaid and Not Viewed, Unpaid and Viewed or Paid.
When Mailing Invoices or For Distribution at a Meeting
- Click the “Download PDF Invoice” button in the “Review Bulk Invoice” popup window. A pdf file will download to the download folder on your computer (or wherever you have set to have downloaded files saved.)
- Open the PDF file from there.
For Individual Invoicing: See the instructions above for Bulk Invoicing - the instructions are the same. Use this feature to create an invoice for an individual rather than a group.
Credits or Balances Carried forward? If a member had a credit or a balance due from a previous invoice, the credit or balance due will be reflected on the "Dues Billing" page where all the members are listed. Because of the amount invoiced and credit or balance, the Invoice Total may be different than the invoiced amount.
Need to View or Make Changes to an Invoice?
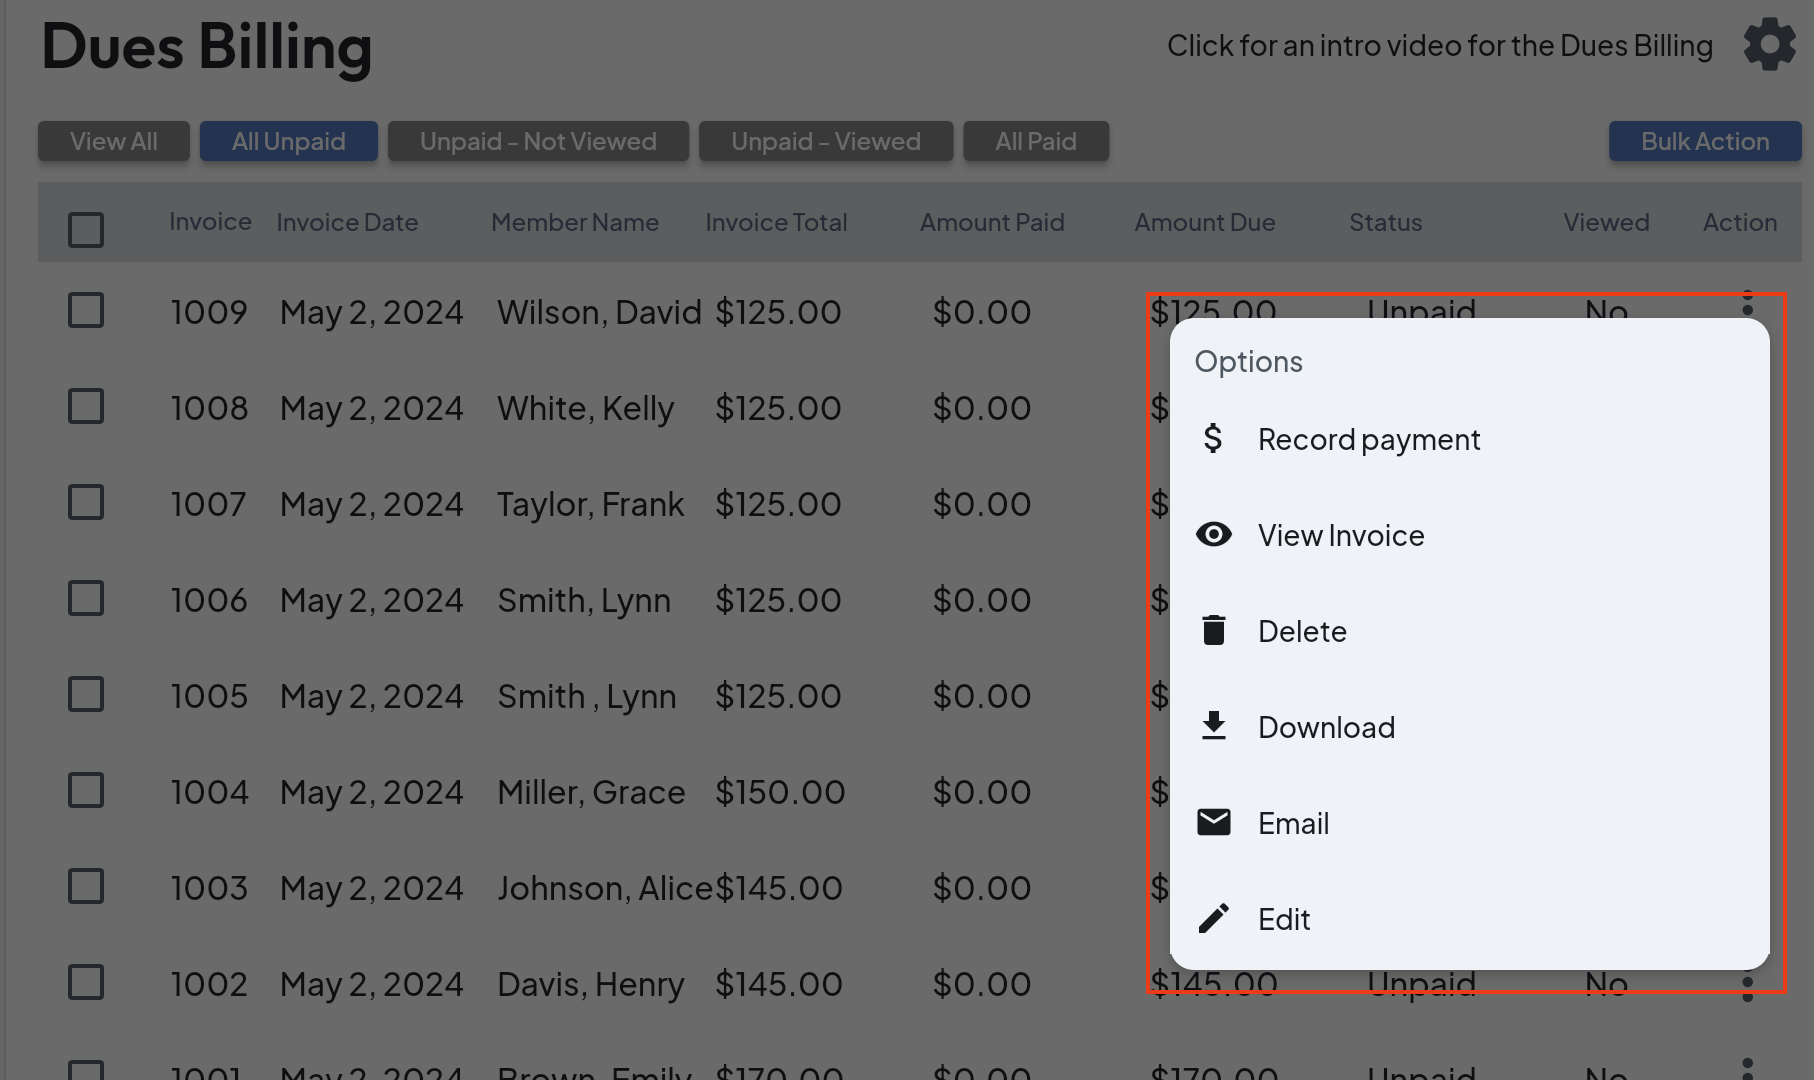
- Click the 3-dots to the right of a member name.
- Choose an option from the list in the popup box to record a payment, view the invoice, delete an invoice, download it, email again, or edit the invoice:
Member View of Online Invoice:
Click the 3-dots to the right, in the row of the member to view and select “View Invoice”.
This is the view that the member will see when they click the link in the invoice email. The member will then click the “Download Invoice” button to download a pdf copy of invoice.

- - - - - - - - - - - - - - - - - - - - - - - - -
5. Recording Payments:
After emailing invoices or providing members with their invoices, payments can be recorded directly within the system by the Dues Billing administrator. The MemberDay platform also supports partial payments, allowing members to pay in installments if needed.
- From the “Dues Billing” page [that shows a log of the members and the invoices], click the 3-dots to the right of the member, then select “Record Payment’. The following popup box shows:
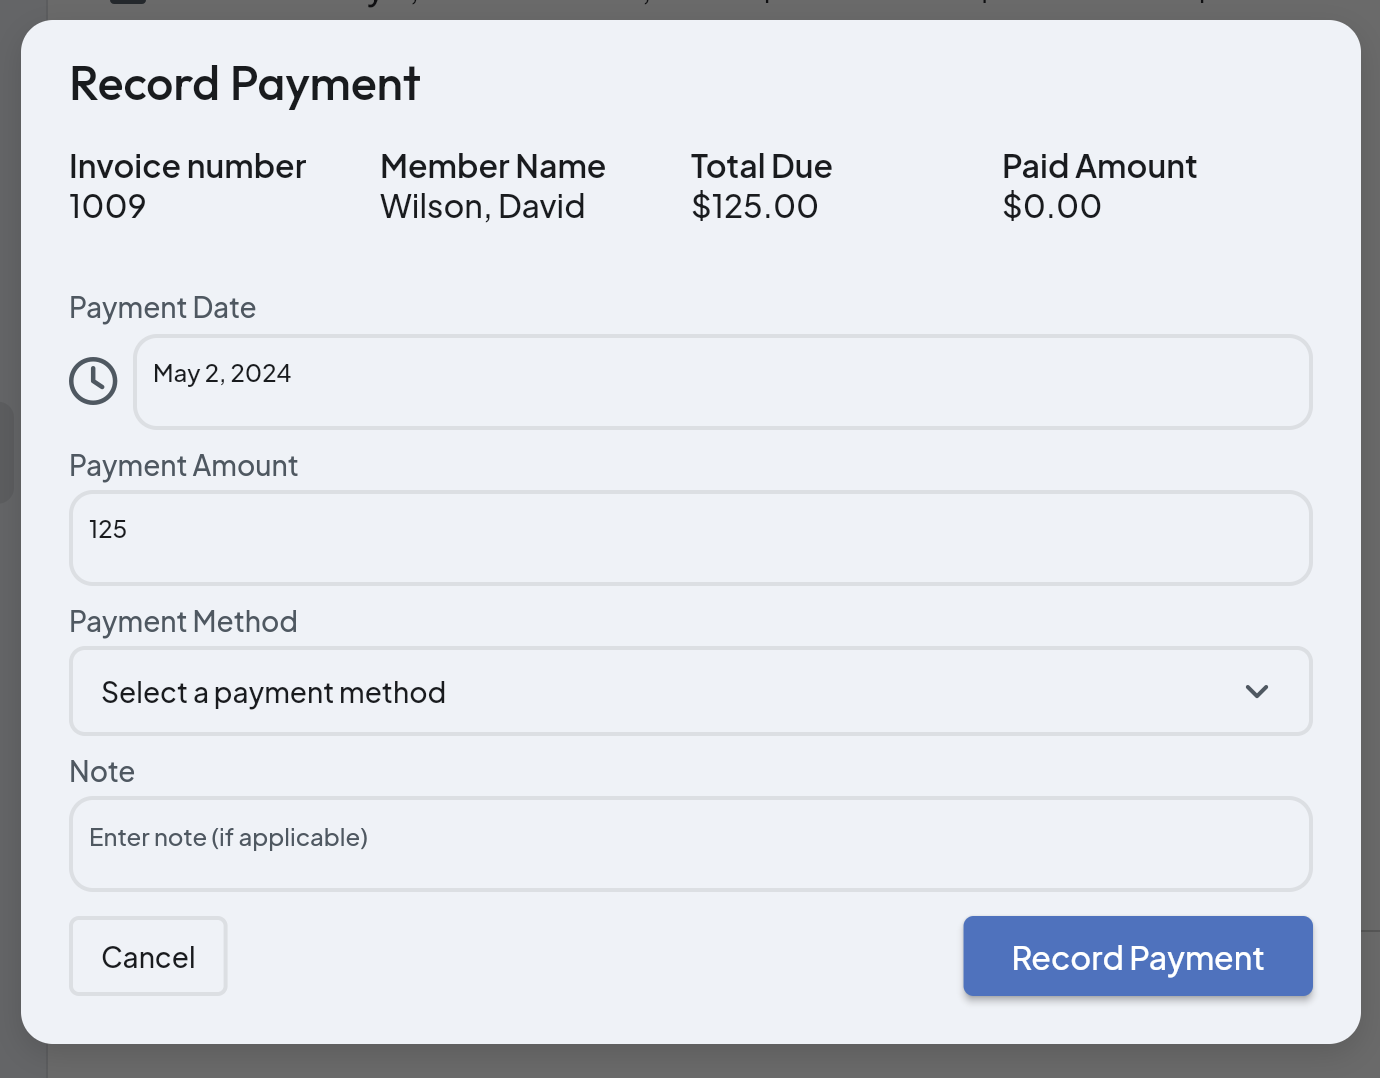
- Specify the payment date, payment amount, payment method, and any notes.
- Click “Record Payment” to mark invoice as paid.
Tip: Use note box to indicate check number if applicable or any special notes.
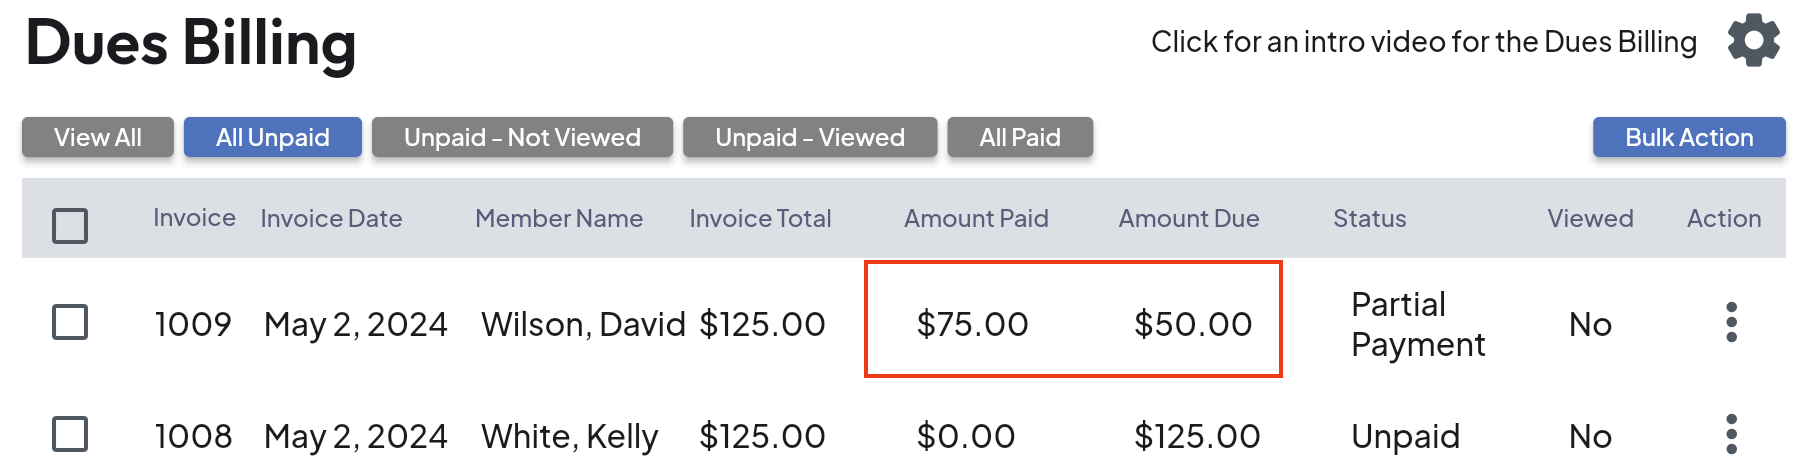
Partial Payments: If a member pays a partial amount, record the amount. The amount paid and the remaining as well as “Partial payment” will show on the Dues Billing log page.

Summary
Now, you've reviewed through the entire Dues Billing Process. By following these steps to set up or dues billing, you can efficiently manage billing profiles, create invoices, and handle payments within the MemberDay platform each time you need to invoice your members!
While this article is more comprehensive than the video, you may find the Dues Billing with Attendance video helpful:
Dues Billing With Attendance Incorporation (Video)
If you have any further questions, or need assistance, please don't hesitate to reach out to our support team.